I owe all the inspiration for this project to my Mom, she first did this at her house in Charleston. Take a look at how it turned out! My mom is also a DIY/home decor genius, how gorgeous is her living room? 😍
She used the Bjorn title stencil from Stencil Revolution on her fireplace. The stencil you need is the 6×6 inch size and its only $5.99.
If you are thinking of tackling this project and have never stenciled before, the part that is going to take you the most time is planning and measuring where to start. Once you get started, it’s pretty easy and the good thing is it’s just paint and you can always paint over it if you mess up or don’t like it.
Supplies
Here is a list of what you will need:
- Stencil sponge
- White paint (I used the color that my mantle was already painted, Wedding White by Behr in semi-gloss)
- Black chalk paint
- Stencil of your choice
- Painters tape
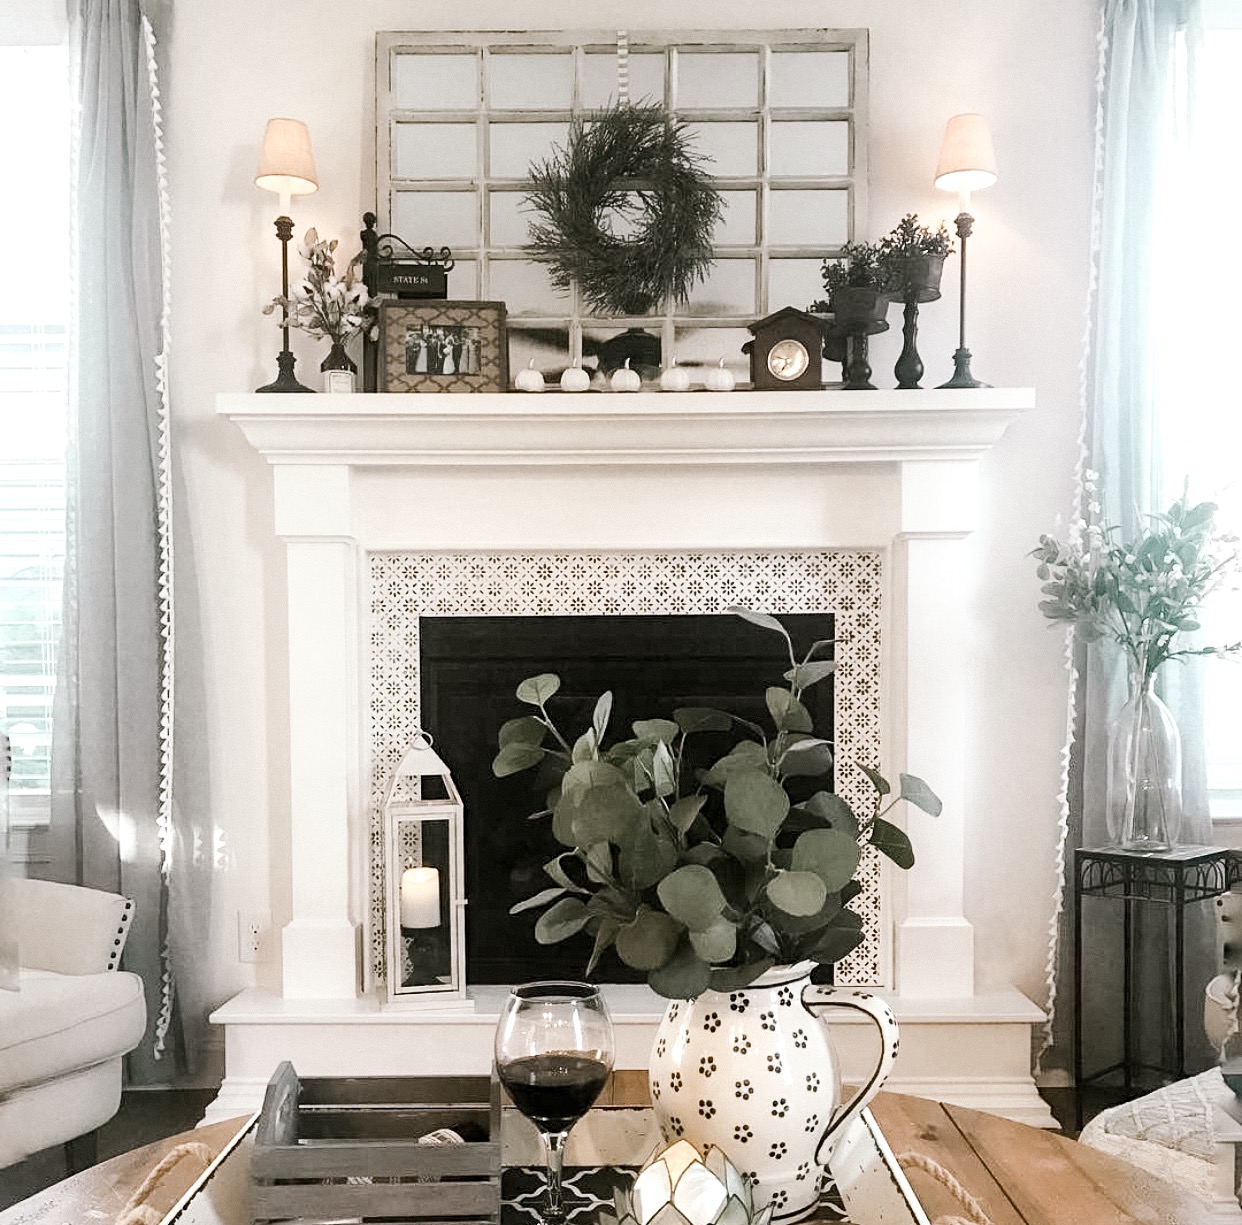
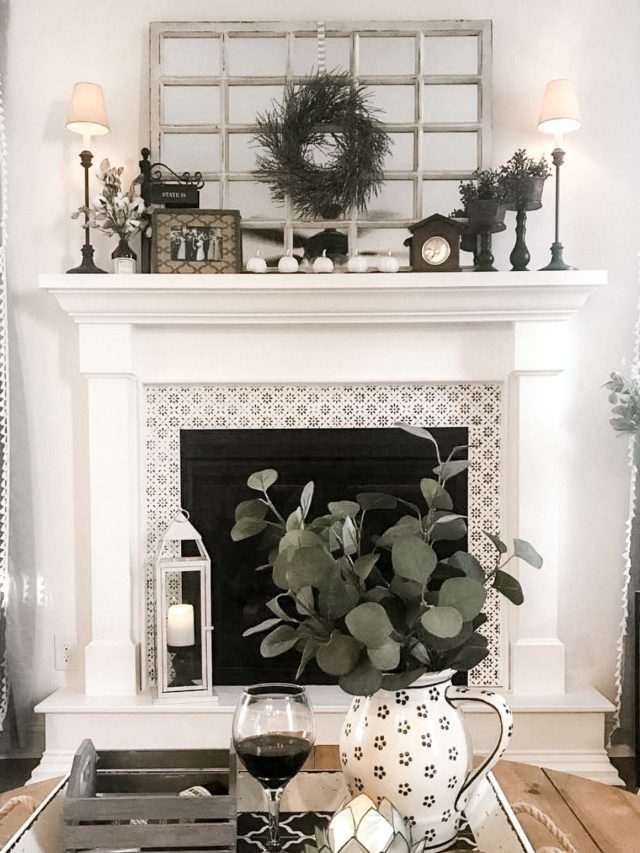
Before

After
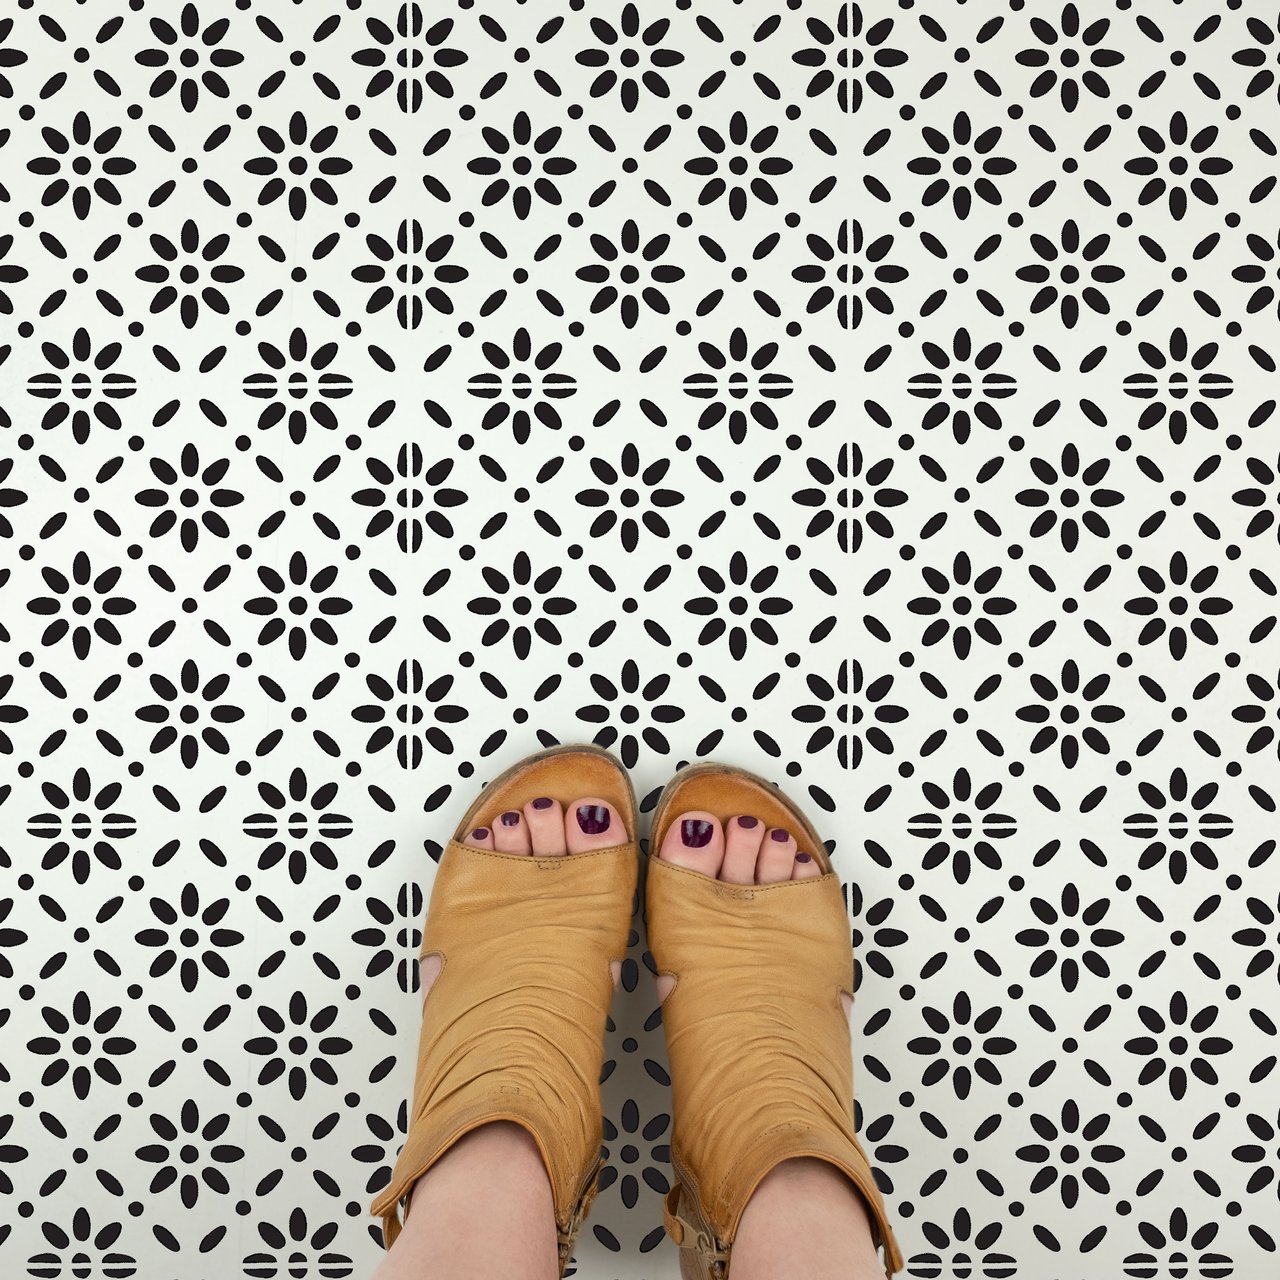
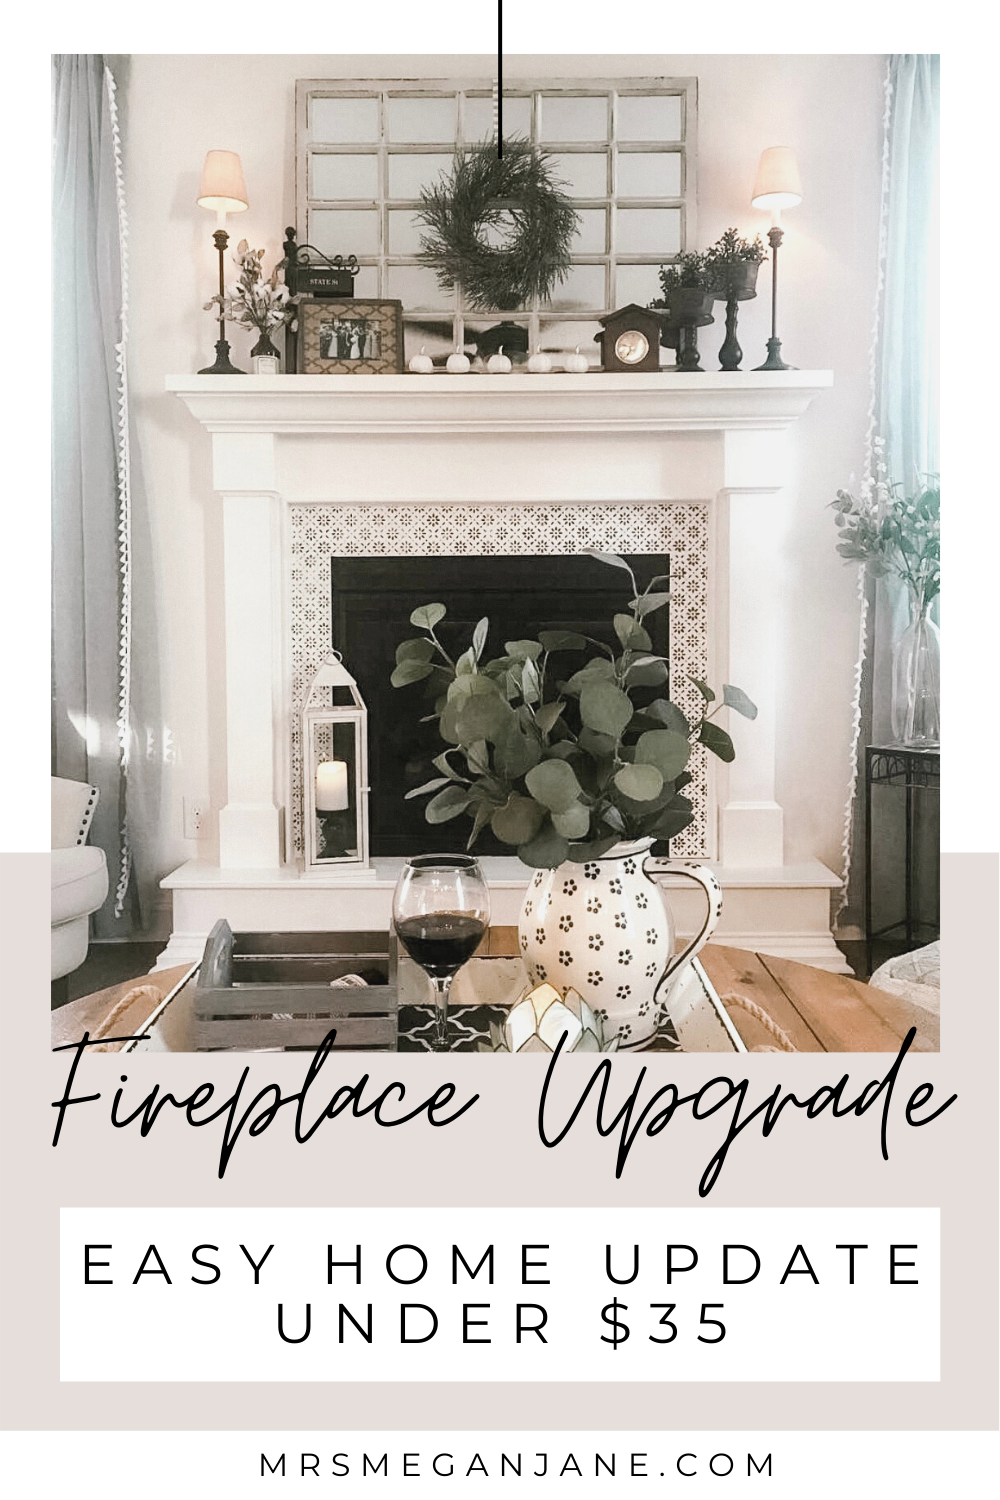
I decided to use the Isabelle tile stencil (size – 6 x 6) and I love how it turned out!

3 Easy Steps
- Plan and measure where to begin with your stencil, you want to make sure the design is centered along the sides and the top. I started in the right hand corner and worked my way down. Then I went across the top to see where I would end up and it worked out nicely. Using a smaller design stencil will be easier (like the Bjorn one above).
- Paint the surround with your white paint. You can even give the mantle and surrounding wood a touch up too while you have the paint out.
- After the white paint is dry, you can start stenciling. Use a very little bit of black paint on a paper plate and lightly sponge it on. The key is not to use too much paint, or it will drip. You should probably use gloves for this part because the stencil will have lots of paint on it. For some reason I have no photo of this part, sorry!

After the black paint is dry and you are finished stenciling, look for any areas that need touching up and go back over them with the white paint with a tiny paint brush. And that’s it! I think start to finish this project took 2-3 hours.


This was a quick and easy project that cost less than $35, and it makes such a huge difference in the room. Please reach out with any questions you may have and I would love to see your finished product if you give this a try. Have fun!
Now, off to watch my team.. GO EAGLES!! 🦅


Hi!! This is gorgeous! I am also looking to update my green marble fireplace. You said that you had chosen 6×6. How wide is the vertical part of your fireplace? Mine is close to 5 inches, do you think I should get a 5×5? Thank you!!
Hi Tracy! Thank you so much. Mine is about 5 inches as well. I just centered the stencil on the sides and bent it up and it fit fine. Or you could do the top and then cut the stencil to fit the sides. You could do a smaller stencil as well! Just try to plan it out before you start.
I just ordered my stencils, im so excited to try this ,and i was just wondering what type of paint you used for the white over your surround first?
Yay so exciting!! I just used the same trim paint that I had lying around. It was a semi gloss paint by behr – everything has held up great!
I love how your project turned out! I just got my stencils today and am using the same one you used. I think I made a mistake when I ordered though. My tiles are 12×12 so that’s what I ordered for a stencil so it will be so much larger than yours. I think I will exchange them.
My other question is – it looks almost like yours is distressed, which I love. Did you achieve that by going lighter in some areas than others with your sponge, or did you sand very lightly after the stencil was dry? I’m guessing you did it with pressure applied to your sponge while stenciling.
Thanks for a great idea!
Hey Kathy! Thanks so much. Yes if you want a similar look use the smaller stencil and just use the tiles as a guideline. The trick to get the distressed look is use very little black paint, blot almost all of it off. You can always add more but can’t take it away! Good luck – would love to see pics!
I LOVE this !! Such a fun project!
Thank you so much! 💗
I am too terrified to DIY anything but at the same time I need my fireplace to look this cute 😭😭
You can definitely do this!! And if it doesn’t go well just paint over it 👌🏻
Hello, I am also a terrified DIYer. Is your surround marble? I desperately need to do this but not sure if I can do this on the marble. Thanks, yours is beautiful and you make it look so easy.
Linda
Thank you Linda! My fireplace is slate but if you’re going to paint over marble I would recommend using chalk paint. You could lightly sand it before hand that will help the paint adhere. You’ve got this 🙌🏻
Thank you for the tips Megan. I have stepped out of my comfort zone (I am so NOT creative or crafty, not even good at painting) and I am following your lead! I have my stencils (deciding between yours and one other). I sanded the marble and have 2 coats of white chalk paint completed. I’m already loving the transformation as the beige marble had to go! Amazon should be delivering the black chalk paint soon. I will post pictures once done. Thanks again,
Linda
Can’t wait to see the photos!! Sounds like you’re on a roll 👏🏻👏🏻
Hi Megan,
This looks fantastic!! Is your fireplace slate? I’ve been looking for some tips on how to go about stenciling on slate- primer/no primer, what kind of paint, sealant, etc. this looks like slate but can’t say for sure.
Just moved to a house with a gas fireplace and we have carpet around the hearth so I want to update the whole thing with stencil. Any tips would be helpful, thanks!
Hi Tania! Thanks so much, yes my fireplace was slate. I just painted it with the paint that I had on hand which was a behr semi-gloss finish for the trim. It’s held up great!
Tania, I had to use a primer/bond as mine was a marble surface. I dont think paint wouldve adhered well without it. I did the primer, then white paint all over, then did the stencil in black. Works great!
Hi! I think my fireplace is marble or something like it too. It’s smooth and shiny. Can you tell me what kind of primer you used? Thanks!
I was so thrilled to find this site, and couldn’t wait to make over my fireplace surround! After new paint and flooring in our living room, it was time to update the fireplace. I considered tile, stick-on tile, even tile stickers. Was so happy I chose to stencil! The hardest part was getting the marble primed, painted and ready to stencil. The rest went fairly quick. I used the Bjorn title stencil from Stencil Revolution, size 6×6 inch. I’m extremely pleased with the finished product! Thanks for the wonderful article and tips! Wish I could post my before/after pics! 🙂
Amazing! I’m so happy you found it helpful. I would love to see your photos- feel free to email them to megan@box2043.temp.domains 😄
What size stencil did you use on yours?
Hi Jennifer! I used the 6×6 inch stencil on my fireplace as well. Just updated the post to reflect that. I realized I never specified, sorry! 🙂
Did you use the 6 x 6 too?
Yes!
It is gorgeous!! Did you also use the 6×6?
Thank you!! Yes I also used the 6 x 6 inch stencil, it’s very flexible so I just centered it and bent up the sides as I stenciled on the smaller areas.
Did you stencil on the grout lines?
Hi Kelly! It wasn’t tile to begin with, so there weren’t any grout lines. If you do have tile you could easily paint over everything and then you could stencil over the grout lines. Good thing is if you mess it up you can always paint over it and redo it ☺️. Hope that helps!
Perfect. Thanks! I love it when there is a fix to a possible mistake. I appreciate your response.
Take care…Kelly
This is a great idea and the result is beautiful. It’s a cool way to have the pattern tile look in a cost effective way.
When I first posted it people really thought it WAS tile! haha
Hi! It looks amazing! I just ordered my stencil and was wondering how you got the paint to look worn instead of new. I love the look!
Hi Tracy! Thank you, the key is to use very little paint. Blot most of it off, you can always add more paint if you think it’s too light.
How does the paint hold up to heat?
Hey Melissa it holds up great! I did this in the winter months when we had the fireplace on all the time. Granted it is a gas fireplace though so it doesn’t give off as much heat or smoke.
I love it!!! I just received my stencil in the mail from Stencil Revolution and I cannot wait to give my fireplace a facelift. I have never stenciled before, but I’ve been watching lots of videos on how to do it. One think I can’t figure out is whether I am supposed to cut off the extra 1/2 inch around the edges of the stencil in order for the pattern to be right on the edge for a flush paint job. Did you cut yours? If not, I’d love extra info on how to get it flush with the edges of the fireplace. Thank you!
Hi Tara! I am SO sorry for the delayed response I am just seeing your comment 😬 I did not cut it but you definitely could trim it to make it fit better. I just held it tightly in place with the edge folded up a little, the stencil was pretty flexible.
This looks GREAT! Definitely will keep this in the back of my mind for future projects!
Thank you Miranda! Always great to have my mom’s help she’s so good at this stuff.
Oh my gosh this is AMAZING! We’ve been looking to upgrade our surround and this is a PERFECT solution! Thank you so much for sharing!
Amazing!! Would love to see pics if you give it a try 🙂
LOVE this! Never would have thought of stenciling a fireplace surround!
Thanks, and it’s so easy too!
It looks sooo good!!! ❤️❤️
Thank you!! Now I want to stencil my bathroom floors 😬🤗